THE MAKING CENTRE

DDES1040 Graphics & Print/Making - Relief Printing

These resources are designed to support students currently enrolled in DDES1040 Graphics & Print/Making and will focus on Relief Printing. For Screen Printing resources, please refer here.

These resource cover the following topics:

Making a Block

Printing

Cleaning Up

Safety First

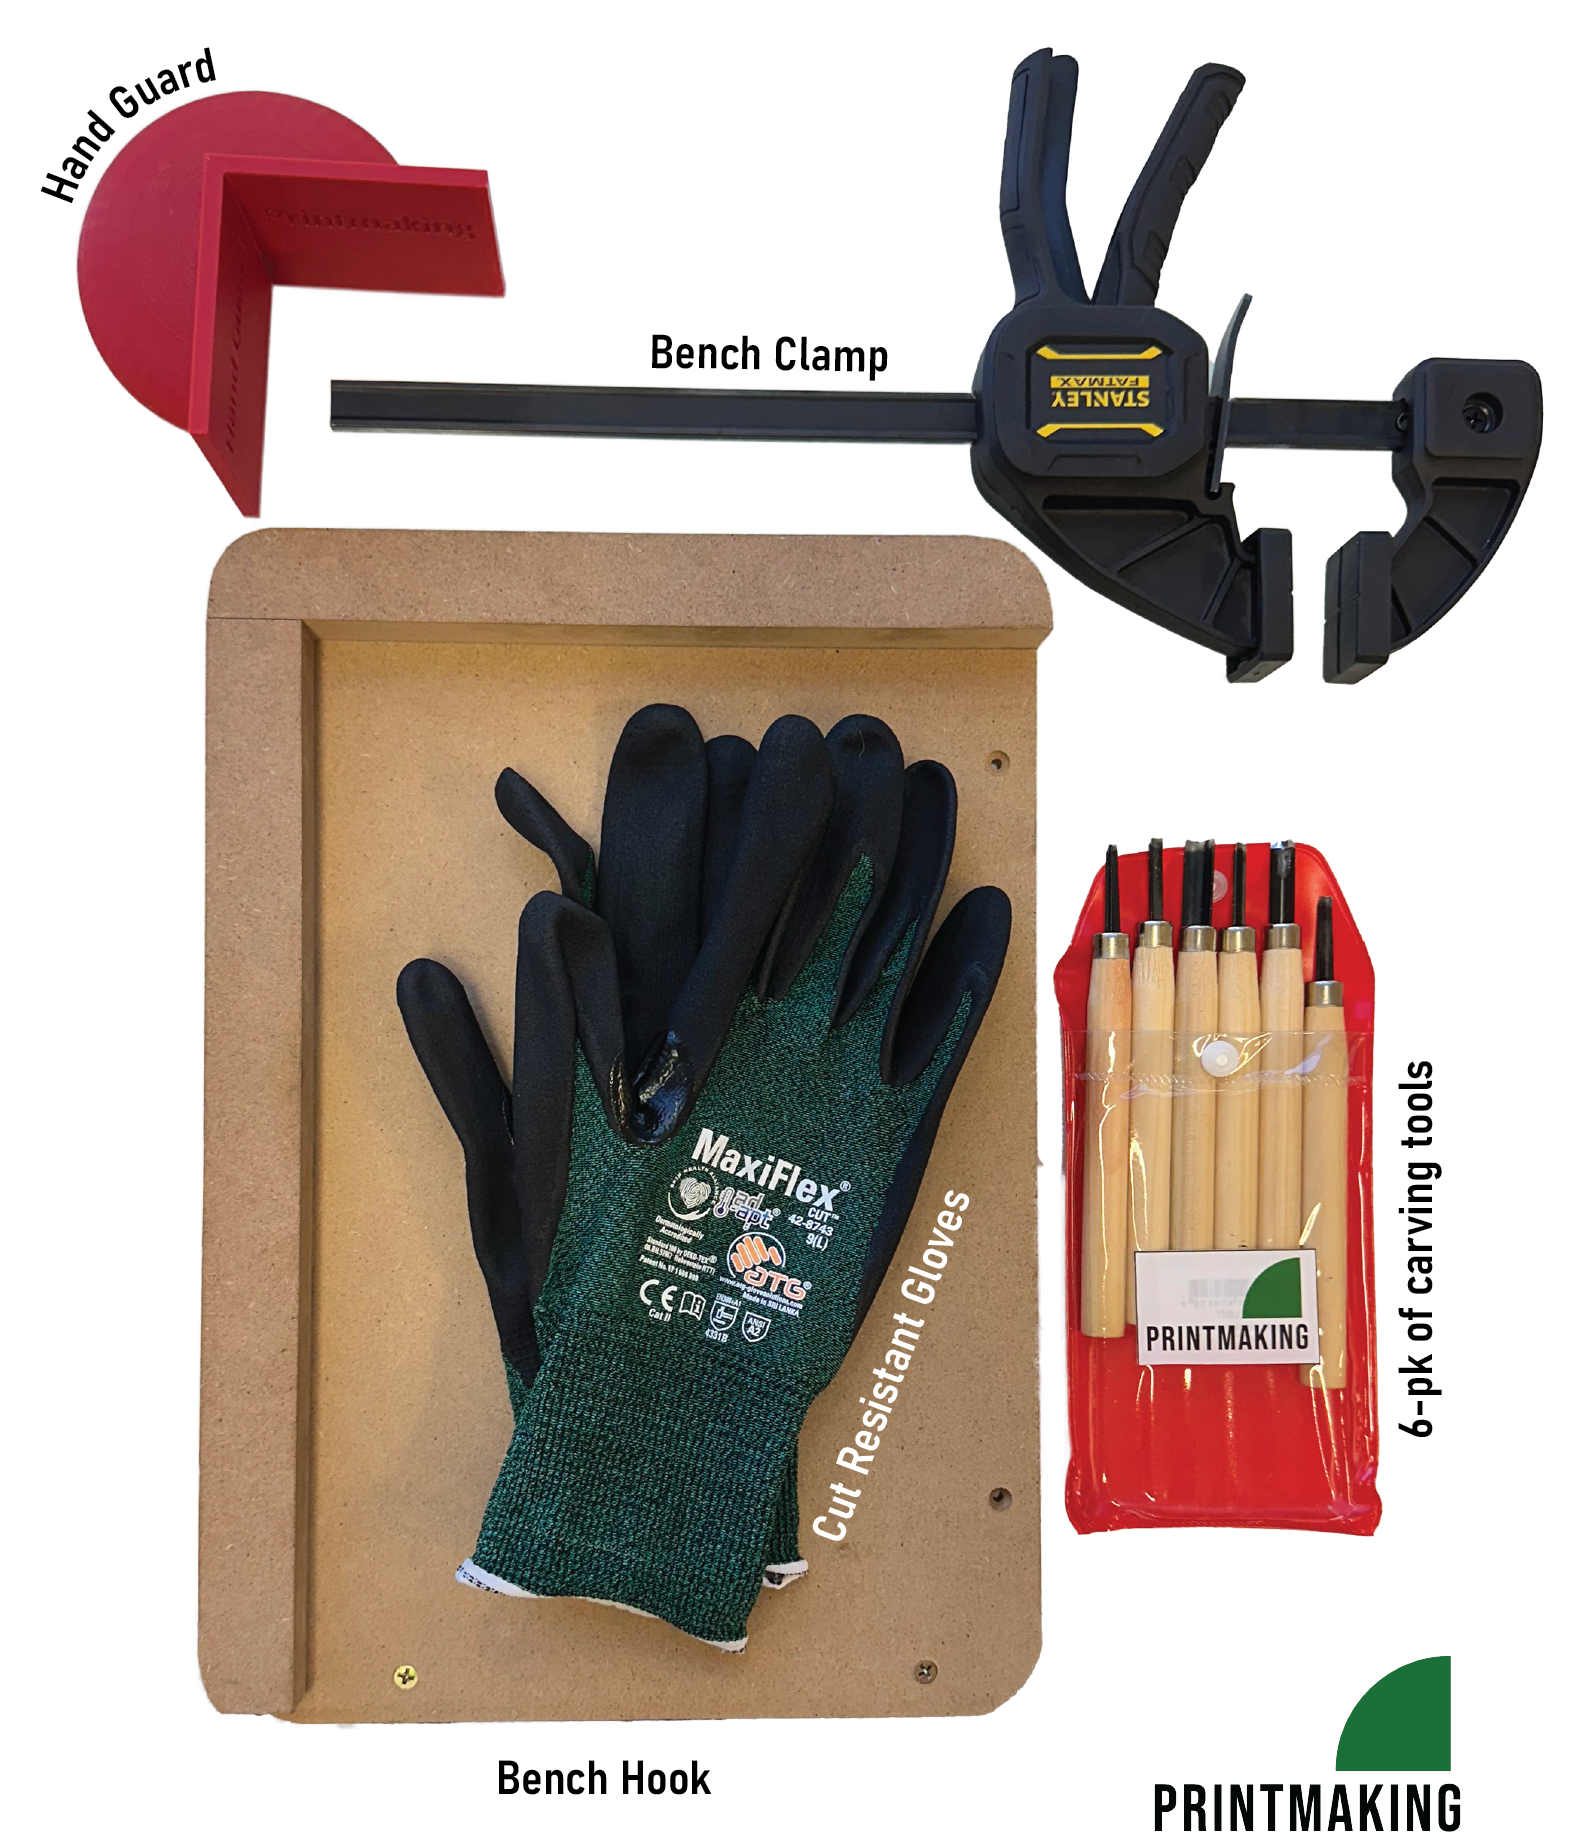
All students are required to complete the following badge before working in the Relief Workshop.

An in-class induction is scheduled during class in Week 1. Please read the Safe Work Procedures before attending. If you miss the first class, you will be required to book a catch up induction outside of class.

Introduction

Relief printmaking refers to the process of carving marks out of a surface. Ink is then applied using a roller so that the ink lies on top of the carved surface. Popular 'block’ materials include wood, silk linoleum, rubber and vinyl.

print_families.jpg

Making a Block

You will be given a 15x15cm silk-cut lino block in Week 1 as part of your class kit. You will carve and print this block during your first class. If you choose to continue with Relief printing, you can purchase more blocks in various materials and sizes from most art stores.

  • Always remember that the image will flip horizontally when it is printed.
  • You can draw directly onto the block with pencil or a marker.
  • A drawing on paper, photocopy or print-out can be transferred onto the block by:
    1. Applying red oxide powder to the back of the paper, place powder-side-down on the block and trace the details with a pen or pencil. The pressure will transfer the powder from the paper to the block. Or;
    2. Place a pre-prepared sheet of red oxide paper, powder-side-down onto the block. Then place your reference paper on top and trace so that the pressure transfers the powder onto the block.
  • It is recommended to reinforce the reference lines with a marker before carving to ensure the stability of the image while you’re working. Otherwise, the powder may rub off. Posca markers are recommended.

Carving kits are available to borrow from technical staff.

Carving Kit

  • Support the block by:
    1. Using your non-dominant hand (behind your carving hand) to anchor the block to your work surface, or;
    2. Use a bench hook or hand guard to carve against, or;
    3. Clamp the block to your work surface.
  • Always carve away from your body and supporting hand. The carving tool can easily slip and cause injury.
  • Remember that you are carving the WHITE (negative) space in your design. The ink will sit on the remaining surface of the block to create the positive image.

U-shaped tools

  • Best for ‘clearing’ larger areas of your design.
  • Be aware of the depth and width of the U. Wide/shallow tools are good for ‘clearing’ background, whereas slimer/deeper tools are best for more intricate areas.

V-shaped tools

  • Best for fine linework, details and outlining a larger area of the block you intend to ‘clear’.

Printing

A range of oil-based relief printing inks are available in the workshop for you to use. The colour range is limited so you will need to mix specific colours according to your design. If you wish to use a non-oil-based relief ink, please provide your own.

While the workshop does have a limited supply of proofing or test paper, you are expected to provide your own, especially your ‘good’ printing paper.

To ensure that your image is repeatedly printed straight and/or exactly where you want it on your paper, you need to create a guide or registration sheet.

  1. Cut a piece of scrap or butcher’s paper to the size of your printing paper or trace the size of your printing paper.
  2. Remembering that your print will flip horizontally, place your block in the desired position and trace.

BEFORE you start inking your block, make sure you set up the press specifically for your block. It is a communal workshop so you may be sharing the press.

1.Reset the pressure boards to medium, registration sheet, plastic sheet, rubber mat.

2. Place your block on the press bed, facing up, and cover with printing paper.

  • Make sure the block is central on the press bed, even if it’s not central on your paper.

3. Place the rubber mat on top and test the pressure.

  • Good pressure = squeeze/resistance from bolt to frame.
  • Not enough pressure = too easy to pull the pressure handle. Add more boards.
  • Too much pressure = you can’t pull the pressure all the way back to the frame of the press. Remove board/s.

4. Once the pressure is good, your ready to start to inking.

1.Select your colour, mix if needed.

  • Always use a clean spatula to dispense ink from the tins. Do not cross-contaminate colours.
  • If mixing a light or pastel colour, add the coloured ink to white so as not to waste ink.

2. Select your roller. Make sure the roller is wider than your block.

3. Dispense a ribbon of ink at the bottom of your slab to roll out. You only need enough ink for one print. Do not roll out all the ink you have mixed as this will be too thick.

4. Roll out the ink by rolling back and forth, lifting after each motion to allow an even coating of ink on the roller.

  • Good ink consistency has a sizzling sound. If it’s too quiet, add more ink. If it sounds too wet, scrape back some ink.

5. To ink up the block, ‘load’ the roller with ink and roll in one direction over the block. Reload with ink, rotate block and roll in one direction. Repeat until you achieve the desired amount of ink (this will change from block to block).

6. Line up the block on your registration sheet/press bed, line up the paper, place down rubber mat and PRINT!

7. Wet prints can be left on the drying rack.

Cleaning Up

All the Printmaking workshops are shared spaces, so you are expected to leave the workspace and tools ready for the next person.

After every print:

  • Promptly remove your block from the press.
  • Wipe down the press bed with a clean rag to prevent ink from getting onto other people’s work.

At the end of the printing session:

  • Wipe down the press bed with glass cleaner.
  • Reset the pressure boards to medium, registration sheet, plastic sheet, rubber mat.

Workstation and tools

  1. Scrape back the excess ink and dispose.
  2. Apply VCA or Vegetable Oil to the ink slab. Roll out with the roller to loosen the ink from the glass and roller.
  3. Wipe away the VCA/ink with a reusable rag.
  4. Roller: make you clean the side of the roller, between the roller and metal bar, and wipe down the handle.
  5. Use VCA and a reusable rag to clean your spatula.
  6. Wipe down all your tools with a clean rag.
  7. Spray the glass slab with glass cleaner to remove the VCA/Vegetable Oil residue.
  8. Dispose our used rags as either reusable or dirty if no longer usable.
  9. If needed, clean the bench with spray and wipe.

Block

  1. Apply VCA directly to reusable rag and wipe the surface of the block to remove ink.
  2. Use spray and wipe to remove residue from the block surface.
  3. Wrap in scrap or newspaper. Do not leave your block in the workshop to dry.

Prints can be left on the drying rack to ‘cure’. Oil-based inks can take a few days to dry completely.

The racks will be cleared regularly. Check the drawers in the workshop for Unracked Prints, either the general drawer or your labelled class drawer.