
What is CNC?
Computer Numerical Control, in one page.
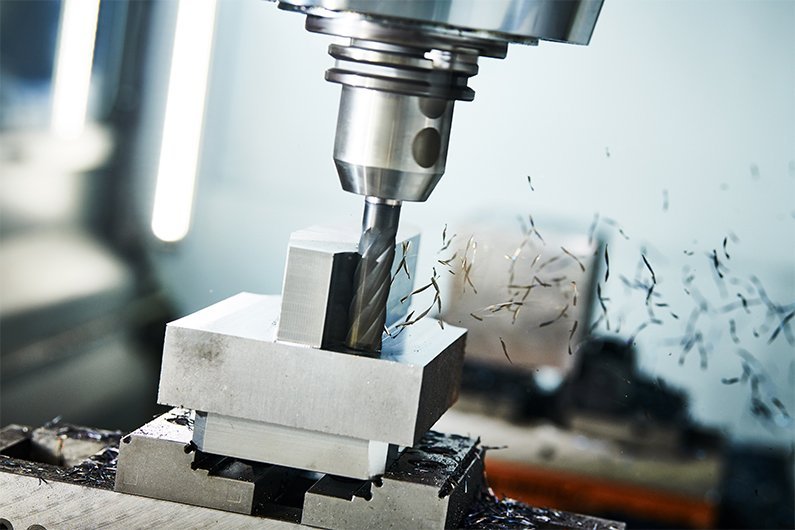
CNC (Computer Numerical Control) is a method of controlling machines using programmed instructions. In a CNC mill, these digital instructions, known as geometric code or G-code, define the movement of tools in 3D space. The same principle underpins a huge range of machines, from 3D printers and laser cutters to complex vending machines.
It shines in subtractive manufacturing, where machine tools such as routers, mills and plasma cutters meticulously remove material from a solid block of stock in a controlled fashion. Unlike additive manufacturing (like 3D printing), which builds objects up layer by layer, CNC milling removes material with a rotating cutting tool to achieve designs with exceptional accuracy and repeatability.
The goal of this badge
Understand the end-to-end CNC workflow, so you have the confidence and knowledge to design and manufacture your own simple parts.
The CNC workflow
Getting a part from an idea to a finished object moves through three linked stages.
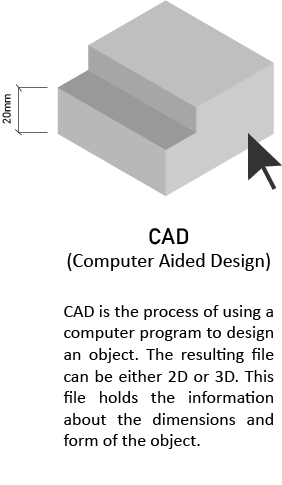
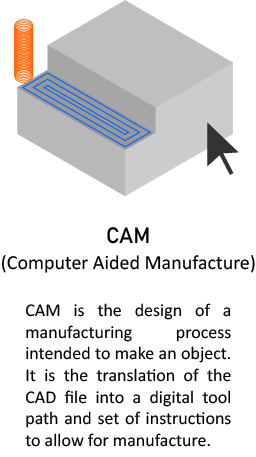
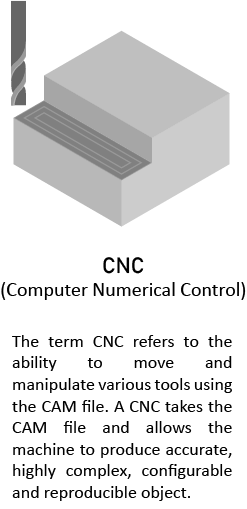
Anatomy of a 3-Axis Machine
What are the key components?
This basics badge focuses on 3-axis CNC milling machines (the machines available to you on upon completion). More powerful and complex machines are covered in future CNC badges. First, let's walk through the key components of a 3-axis CNC Mill.

Linear axes
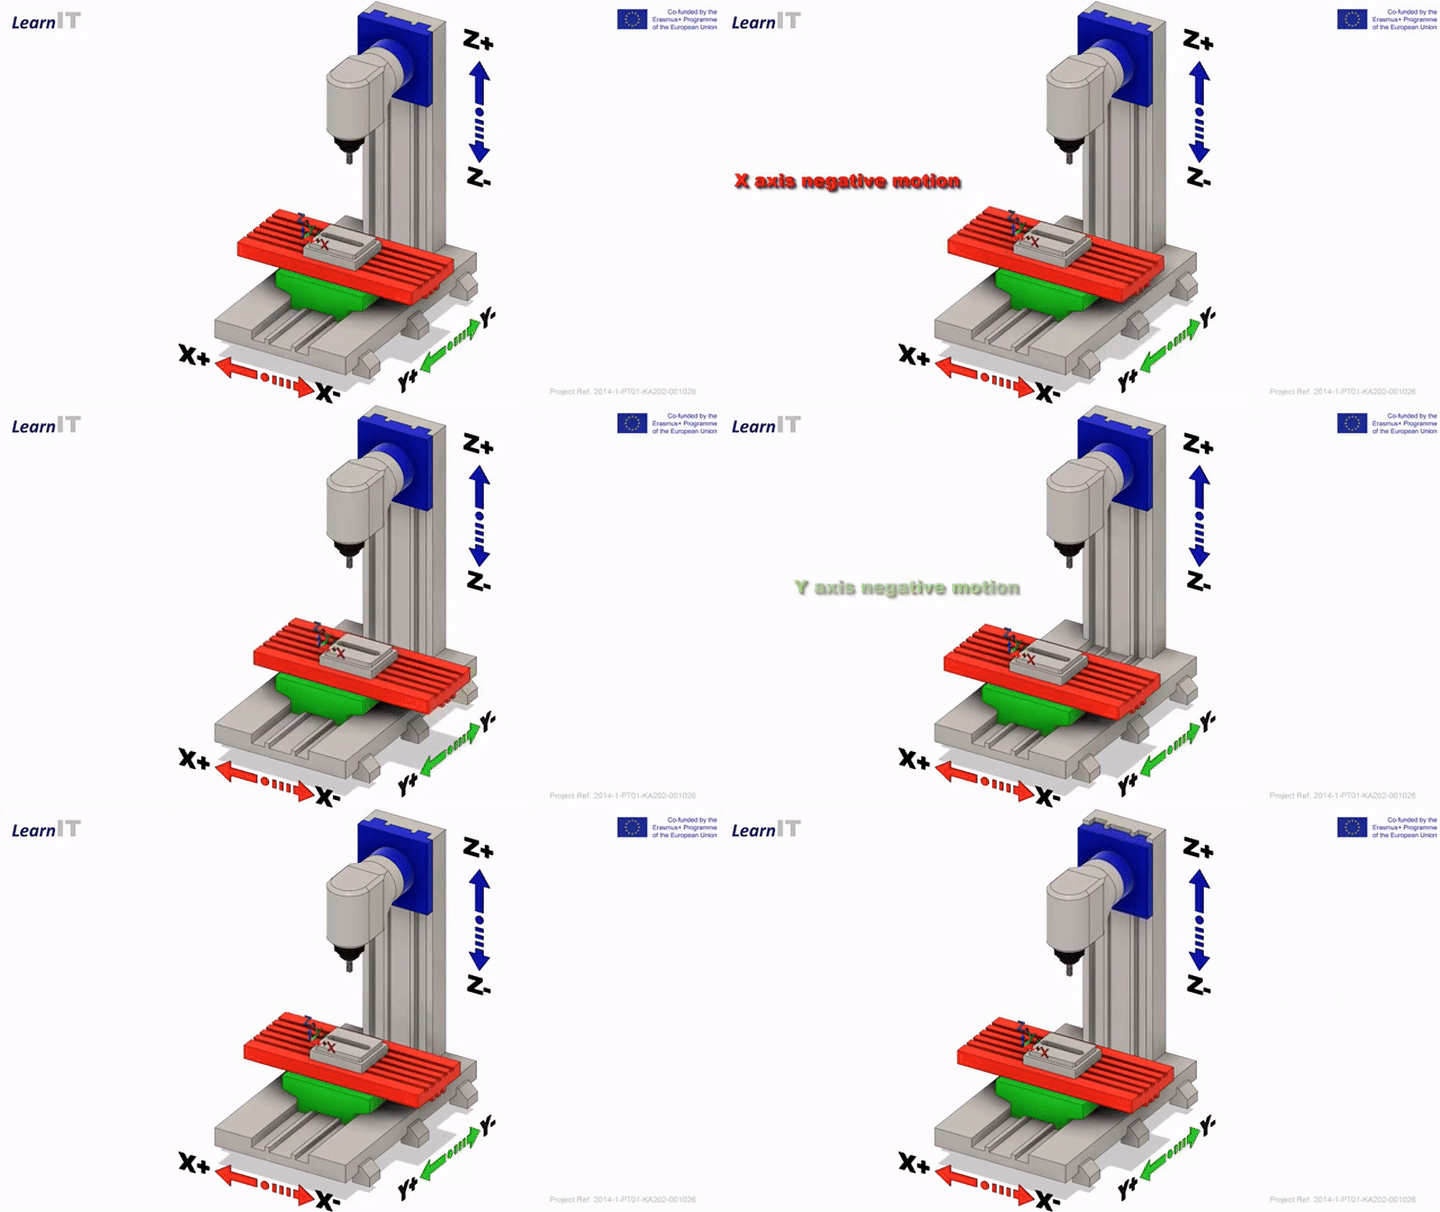
An axis represents a direction of movement. The standard cartesian axes on a 3-axis machine are X, Y and Z . Together they guide the movement of the cutting tool or workpiece through three-dimensional space.
The X and Y axes (red and green respectively below) control the horizontal shifting of the workpiece, left, right, back and forth at a constant height. The Z axis (blue below) is responsible for the vertical travel of the spindle, letting it move up and down.
Going further
Some machines add a fourth axis (often referred to as an A-axis) that rotates the workpiece, enabling a wider variety of designs. That mode is covered in future content.
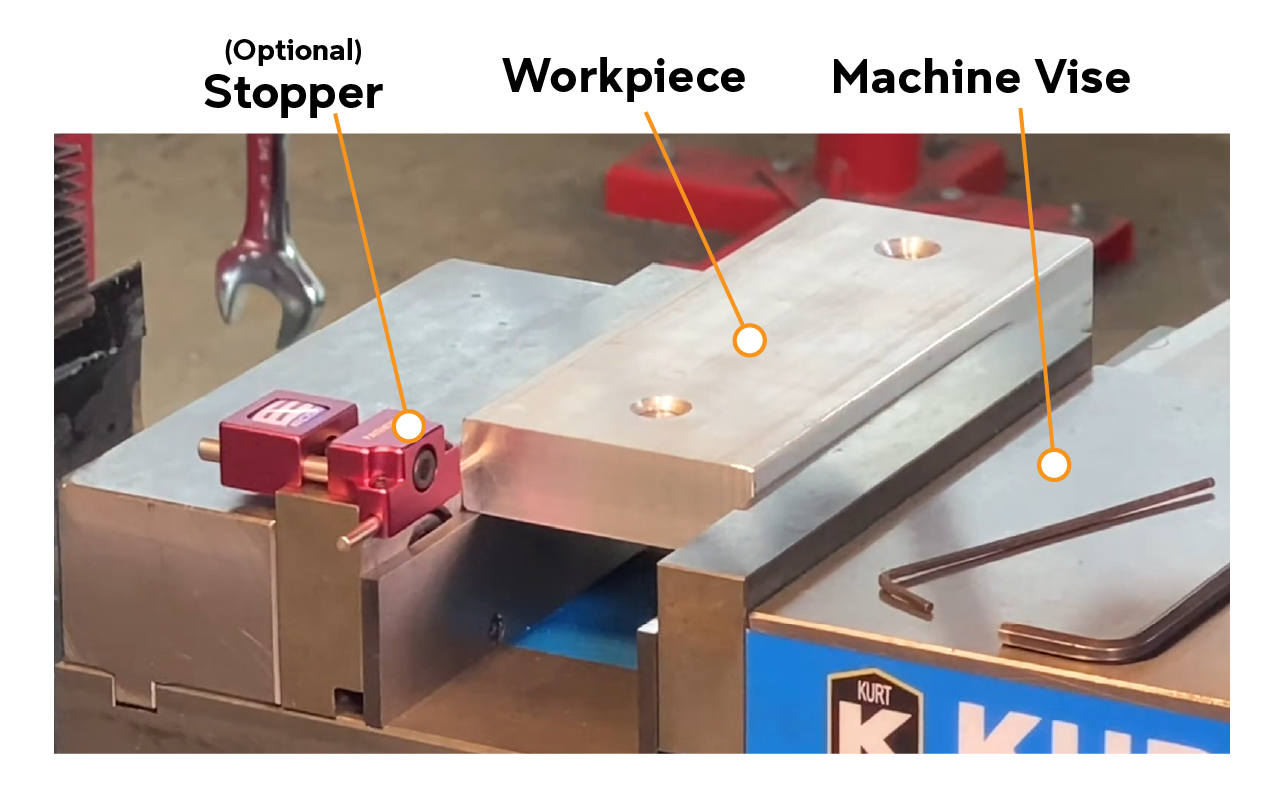
Workpiece (stock)
The workpiece, or stock, is the raw material from which the design is made. It must have geometry that can be securely attached to the CNC bed, a process known as fixturing or workpiece hold-down. Common methods include a vice, chuck or fixturing table.
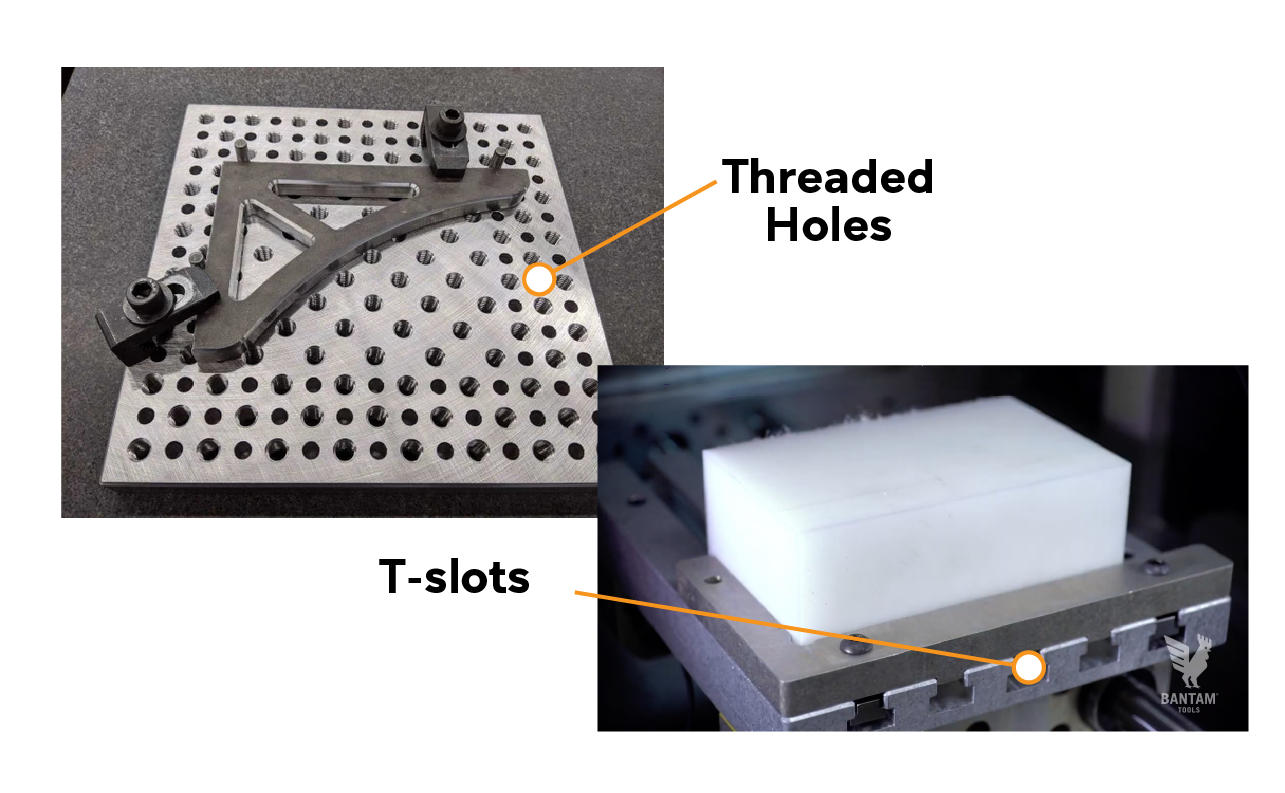
Fixturing table (bed)
The fixturing table, or machine bed, is the rigid base on which machining takes place. It provides a flat, stable reference surface and typically contains T-slots or threaded holes into which a work-holding device (a vice, for example) can be installed to hold stock securely.
Depending on the machine, the table is mechanically aligned to the machine's linear motion, so its surface is parallel to the X and/or Y planes of motion. Typically, to move the tool around the stock, the entire bed moves.
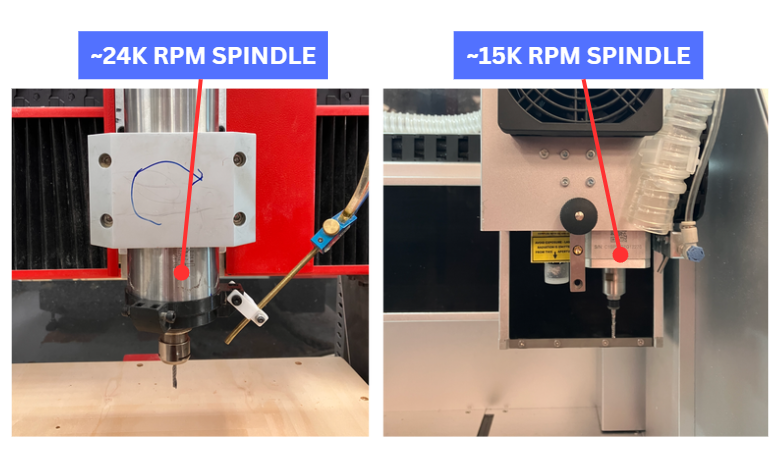
Spindle
The spindle motor powers and rotates the cutting tool. Its key parameters are maximum rotational speed (measured in revolutions per minute [RPM]) and power [W], which together define cutting capability.
Desktop CNC spindles typically reach ~15,000 RPM with lower power, suited to small tools and light cuts. Larger industrial spindles, such as the Symbiosis CNC, can reach ~24,000 RPM while providing much higher torque, enabling heavier material removal. Understanding your machine's spindle capability and limitations matters in later modules.
Air supply / coolant
Many CNC machines need compressed air to operate certain functions. Plumbed compressed air aimed at the cutting end helps evacuate chips and cool the tool and material. On more complex machines, tool changers and coolant-mist accessories also rely on an external air supply.
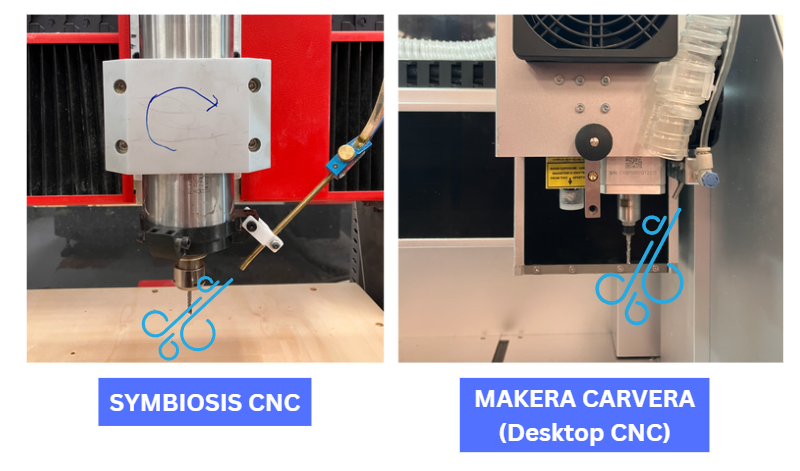
Controller (HMI)
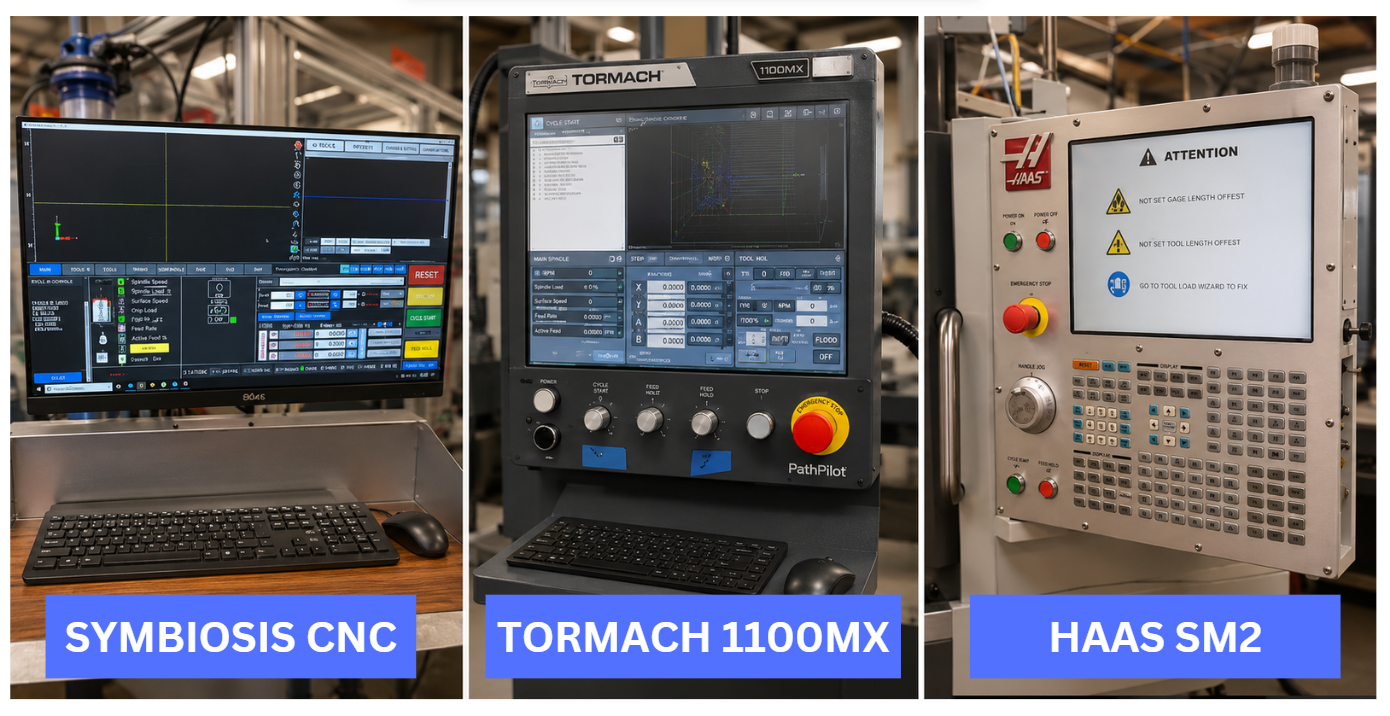
The controller, or Human Machine Interface (HMI), typically takes the form of a custom computer and is used to execute the machine's functions. Different manufacturers (Makera, HAAS, Tormach, etc.) use different controller software and button layouts. However they're all functionally similar, and once you learn one it's easy to pick up others.
Tool & tool holder
The tool (the cutting bit) is the business end of the mill. It rotates, and its sharp edges make direct contact with the stock to mill, drill or shape the design. Tooling differences are covered in the next module.
A unique segmented clamping system called a collet secures the cutting tool to the tool holder. A collet is effectively a spring that clamps evenly around a tool when tightened.
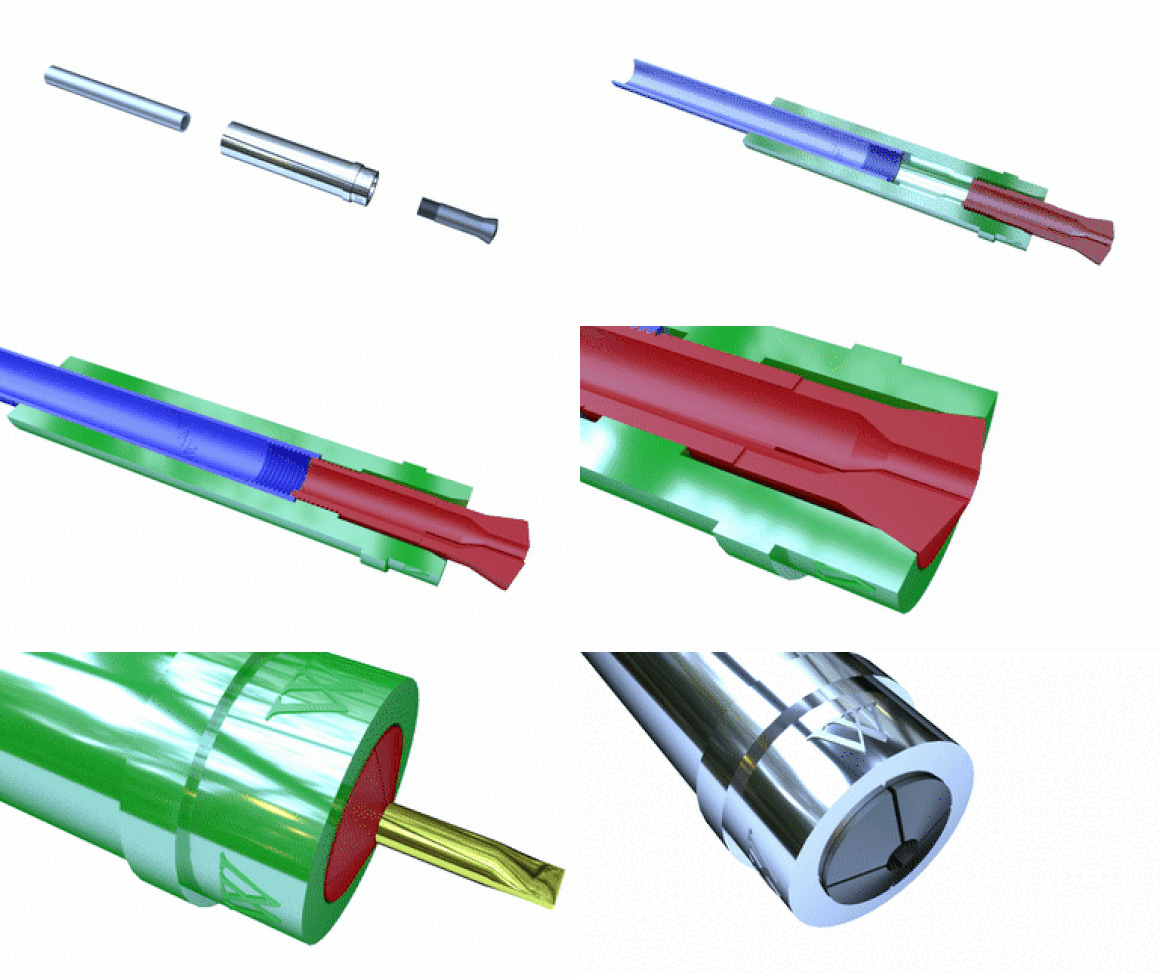
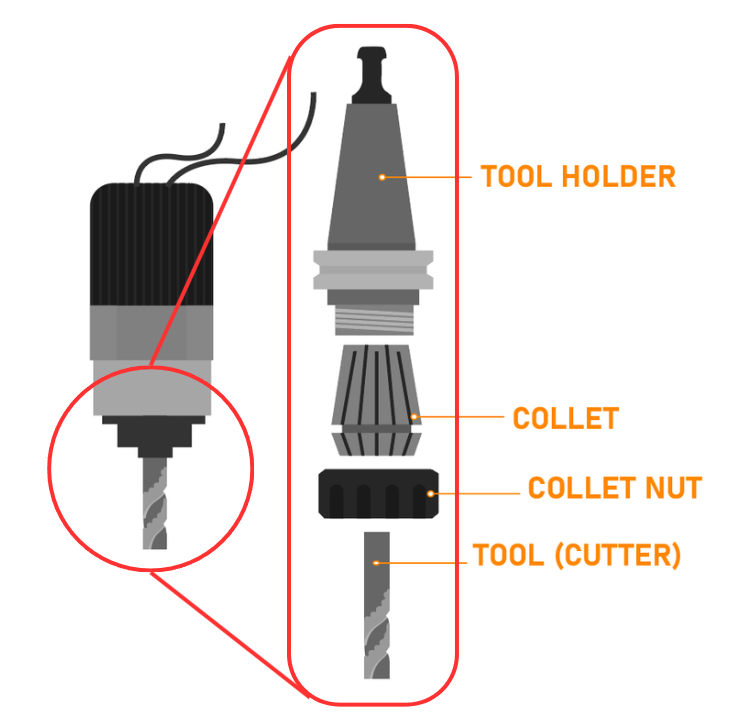
Tool-holder types vary between CNCs. On larger machines, air-assisted tool holders enable quick exchange of pre-set tools of different diameters, streamlining tool changes and widening the range of tools that can be used. On desktop CNCs, a fixed-size collet chuck holds tools of matching diameter — a 3 mm collet accepts only 3 mm-shanked tools. This design has fewer components and is often preferred for its simplicity and cost, but limits the tool sizes available.
Automatic Tool Changer
Swapping tools without operator intervention.
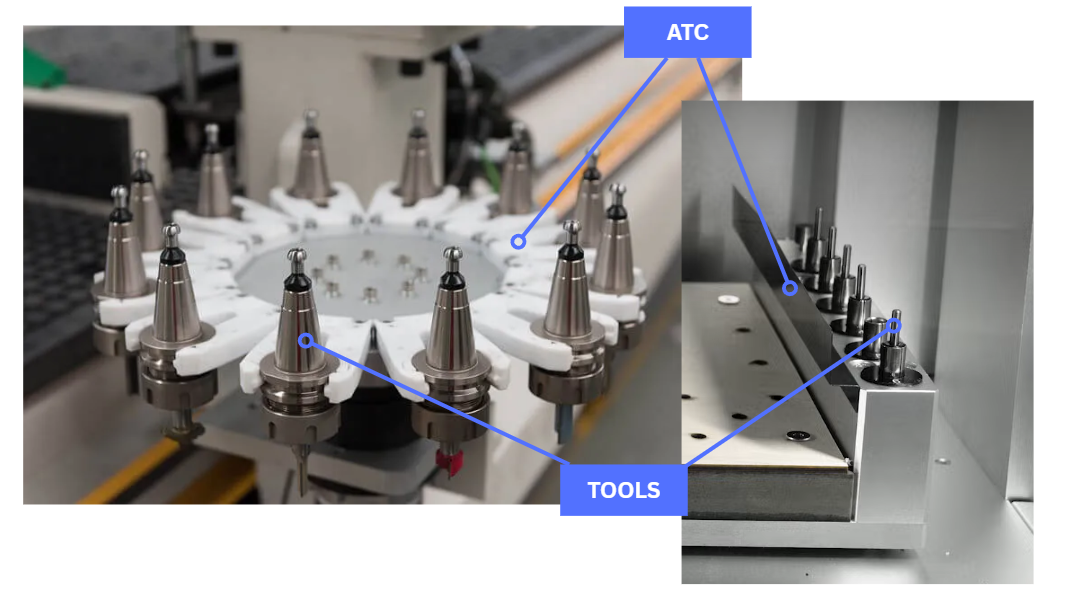
Some CNC mills are equipped with an Automatic Tool Changer (ATC), which lets the machine switch between tools on its own. When an operation requires a different tool, the machine runs a sequence to return the current tool and retrieve the next one from the tool carousel or magazine.
This reduces operator involvement, improves machining efficiency, and enables more complex multi-tool operations to run unattended, once you have the confidence to let them.
Coordinate Principles & Machine Offsets
How we tell the machine where to cut.
A CNC machine does not understand what it's machining. It grimly executes your motion commands, then sits motionless until it's time to execute again. The machine is "dumb", so the instructions you give it must be carefully considered. So how do we tell the machine where to cut and where not to cut? Where to start and where to end? This is where coordinate principles and machine offsets come into play.
Two coordinate systems
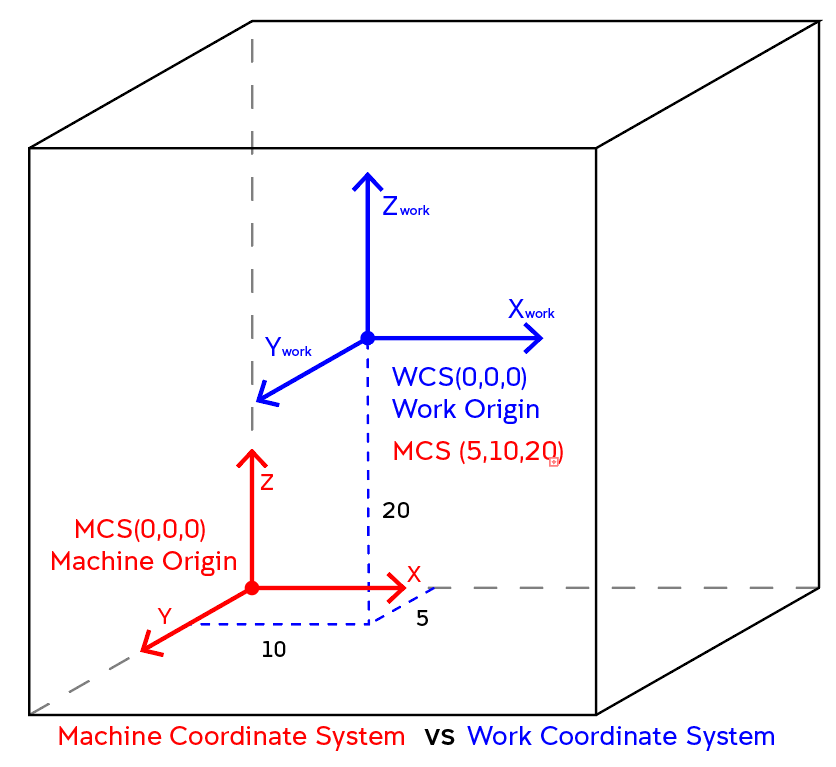
A coordinate system is a cartesian origin (X=0, Y=0, Z=0) with axes. The Machine Coordinate System (MCS) is the 3-dimensional volume the machine can move within — picture a cube with its origin in a corner. The CNC head moves a relative distance into that volume and is constrained to stay inside it.
A Work Coordinate System (WCS) is a user-defined reference point that lives inside the MCS volume. Its origin sits at a specific offset (distance) from the MCS origin. The WCS is defined in your CAM software: all cutting movement is defined from this origin, giving a clean way to communicate positions to the machine.
Working the offset
In the example above, the WCS (blue) origin has a machine offset from the MCS origin. Follow how a move in the WCS maps back to the machine:
Why it matters
As you gain experience, we'll discuss why carefully choosing the location of your WCS is important, as it affects how easy your part is to set up and machine.
Materials
What can I machine in the UNSW Makerspace Network?
A wide range of stock can be cut on the CNCs in the Makerspace network from timber, foams, plastics and softer metals.
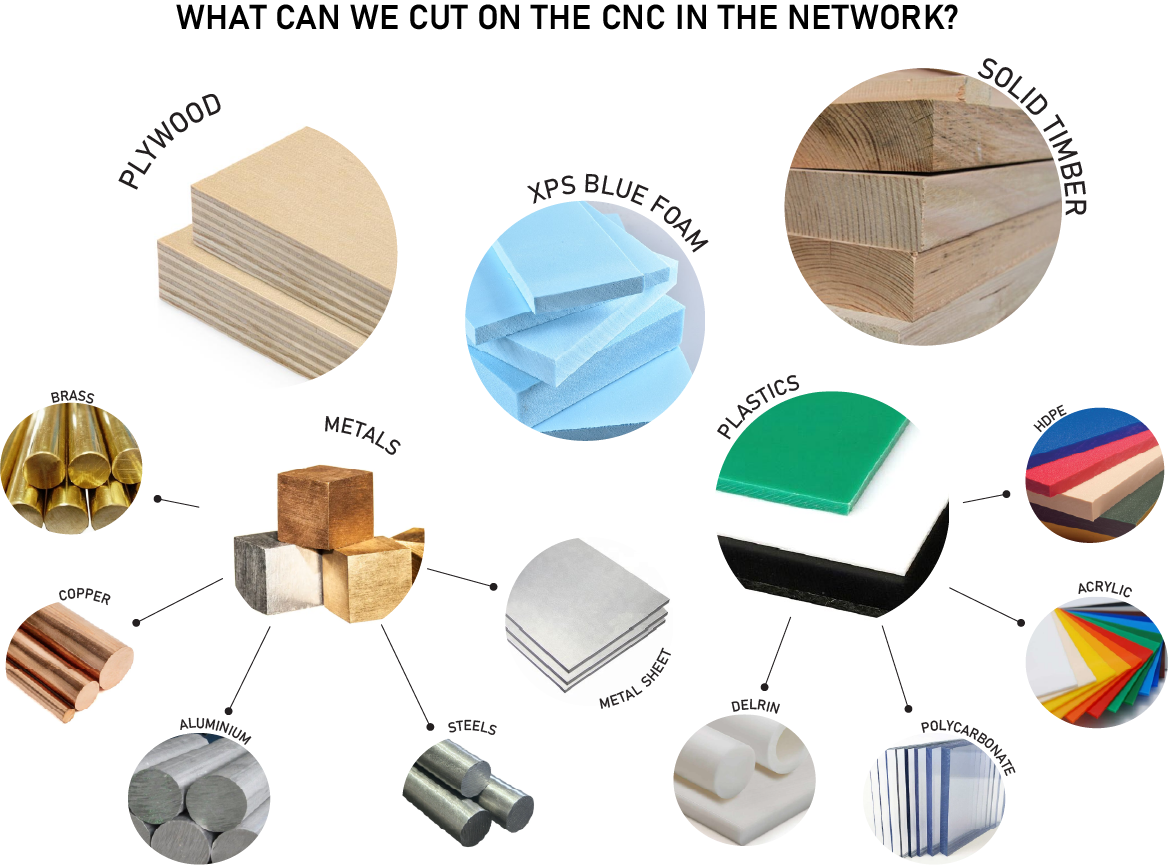
Soft metals such as aluminium, brass and copper are ideal for machining in the desktop CNC mills. Harder materials such as steel and titanium require more powerful machines with specialised tooling.
BANNED MATERIALS FOR CNC MACHINING
Combustible materials (titanium included), graphene, composite materials (such as carbon fibre or fibreglass), and ceramics cannot be machined within the Makersapce Network. Combustible materials are a fire risk; graphene and composite dust can corrode key components, risk shorting electronics, and are a health hazard.
With every material, consider extraction. Ask yourself: does what I'm machining create dust or fine airborne particles? If so, a vacuum or extraction unit is necessary. If you're unsure about which materials are safe to use, always ask the staff. For a specific need to machine high-risk materials (thesis or postgraduate work), speak to staff directly.
Material Procurement
Where can you buy materials in Sydney?
The James Kirby Makerspace (UNSW Sydney) keeps a limited supply of machining stock for various needs, plus a scrap bin with off-cuts free to a good home. Ask a staff member about availability for your project.
For large quantities or unspoiled material you'll need to provide your own. Here are some local starting points (sydney based). Alternatively, Amazon, AliExpress and eBay are also worth a look.
| Material | Company | Link |
|---|---|---|
| Aluminium, brass & steels | Edcon Steel | edconsteel.com.au |
| Aluminium, brass & steels | Calm Aluminium | calm-aluminium.com.au |
| Hard & soft plastics | DFL shop on campus (UNSW Sydney) | making.unsw.edu.au/dfl/shop |
| Hard & soft plastics | Australian Plastic Fabricators | australianplasticfabricators.com.au |
| Engineering materials (fancy alloys) | Vulcan (steel suppliers) | vulcan.co/contact/steel-sydney |
