Although they may appear similar in appearance, end mills and drill bits serve distinct purposes. Drill bits are crafted for plunging directly into materials to fashion cylindrical holes, while end mills are tailored for lateral cutting. End mills feature sharp edges, termed flutes, running along the tool, which efficiently cut when gradually moving sideways into the material, as opposed to vertical plunging.

_________________________________________________________________________________

These bits are commonly used for removing material and finishing horizontal and vertical surfaces. These are the most common tools used when CNC machining.

Bull nose end mills feature a flat end with a corner radius. These tools tend to have a longer lifespan compared to flat-end mills and can be utilized to finish both flat and vertical walls. However, bullnose end mills leave internal radii on all edges.


Ball end mills feature a spherical end and are utilised for surfacing complex shapes. Although they are beneficial for curved surfaces, they create peaks (called cusps) when applied to flat surfaces.


Chamfer end mills feature a V shape and are commonly available in 90- and 60-degree angles. They are used to create sharp edges, cut mitres, and engrave fine details.


Engraving mills use a rotating cutting tool to carve or etch designs into hard materials like metal, wood, or plastic. The mill precisely moves the material or the cutting tool along multiple axes to create detailed and accurate engravings.


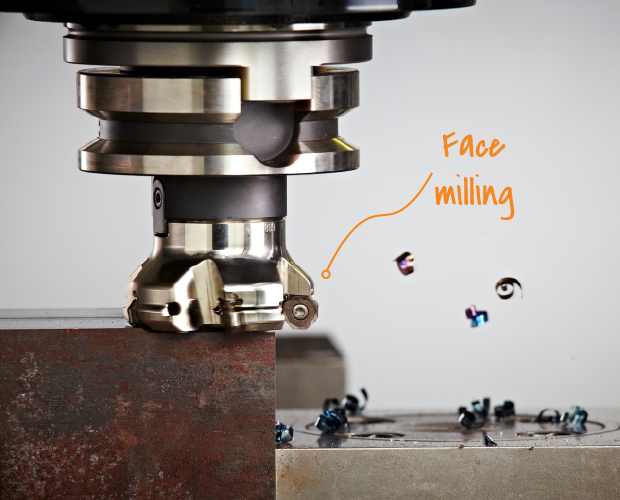
Indexable mills are cutting tools designed with replaceable cutting edges, which allow for quick and easy swapping of the inserts without having to detach the tool from the machine. This feature enhances efficiency and reduces downtime. These mills are versatile and are utilized for various milling operations, including face milling and material removal.
In Engineering Makerspaces, we primarily use two types of indexable end mills: face mills and shoulder mills. The main difference between these two lies in their cutting surfaces. Shoulder mills are specialized for machining the sides or "shoulders" of a workpiece, requiring cutters with a specific geometry designed for this task. On the other hand, face mills focus on the upper surface of the material, using cutters optimized for horizontal cutting. Shoulder milling is typically used to create precise vertical features like groove walls or slots, whereas face milling is mainly used for flattening or contouring horizontal surfaces, such as the top of a workpiece.


_________________________________________________________________________________
Flutes are the cutting surfaces of an end mill. These deep, spiralled grooves facilitate chip formation and evacuation, assisting in the cutting of the material. The number of flutes on an end mill influences the chip size, feed rate and surface finish. Increasing the number of flutes allows you to increase the tool feed rate to cut faster and should create a better surface finish. But more flutes makes each flute smaller and more delicate and creates higher heat, making the tool unsuitable for certain materials. Conversely, fewer flutes increase the chip size, clearing capacity and possible load per tooth.
Flutes with a higher helix angle more aggressively eject chips, which is beneficial for materials where chip removal is critical, such as metals. For softer materials, like wood, a lower helix angle—or even a straight-fluted tool—can produce a finer edge finish. The helix angle of the tool creates a axial (vertical) force that can affect your work holding.
The flute cutting direction determines the chip movement. This direction can be identified visually by spinning the end mill clockwise and observing the direction in which the flutes move. When cutting wood, the edge opposite the chip direction will exhibit a superior finish.


_________________________________________________________________________________

The length and diameter of an end mill dictate the depth and detail that can be achieved. These factors can also affect the speed of a project. The larger the end mill the more material it will remove, and the fewer details it can achieve. The smaller the end mill, the less material it can remove (making it slower) and the more details it can cut.

Due to all end mills being spinning cutters, they inevitably leave fillets equal to the radius of the tool on the internal corners of the object. Bull nose end mills additionally leave a fillet on the bottom edges. Achieving sharp vertical internal corners is impossible! This detail becomes crucial when attempting to create joinery or complementary parts that fit together seamlessly.
If an end mill is inserted into the material too abruptly, it faces an excessive load that may cause it to break. Conversely, cutting too slowly can lead to grinding, friction, excessive heat, and accelerated wear of the tool. The load on the tool should ideally be constant and adjusted with care.
To prevent tool breakage during clearing, it is essential to use slow, gradual passes that step down and move radially to cut the material.
Mastering the proper configuration of end-mill engagement for clearing requires practice and experience. More information will be covered in the next module.
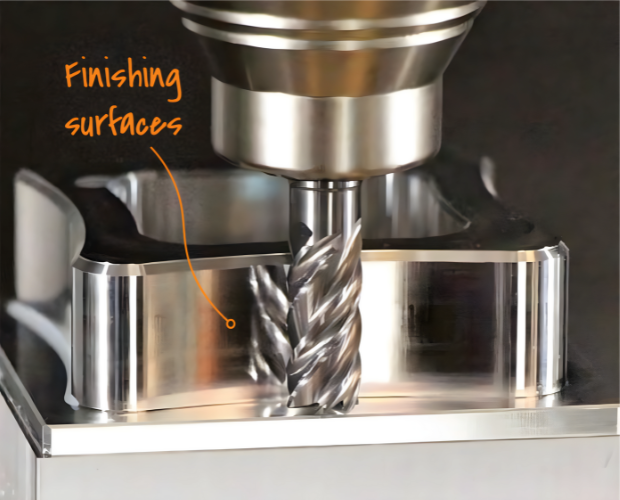
The quality and precision of a part are significantly influenced by how the tool interacts with the surface during finishing. Finishing is removing the last small amount of material and is usually done with much less tool load, in order to minimise tool deflection and vibration.
To achieve the best vertical finishes, utilize the maximum length of the flute available without engaging the end of the bit.
For optimal finishing and facing of horizontal surfaces, ensure maximum engagement with the end of the tool.
When facing, it is advisable to avoid contact with the centre of the tool and to maximize surface speed.