UNSW Making

Laser Cutting with Trotec Ruby

A reference guide for laser cutting in the James N. Kirby and MCIC Makerspace.

Summary of Laser Cutting Steps

Ruby login


Start by logging into the Ruby software using the passwords provided on our computers


On the Manage page in Ruby import your file.
Accepted file types include; .dxf, .svg, .pdf, .ai


Change your paths to the desired layers, check out the chart here for a reference.
Any paths you'd like to be engraved need to be on the Engrave layer and they need to be a Fill or solid shape.


Check your design has imported in the correct scale and then click Fit to design before clicking Create Job


Under the Job Queue in Job Control click and drag your job into the plate and position your job on top of your material.

Use the laser cutter crosshair (the red dot) to help you reference.

check inner geometry, overlapping lines, and geometry optimisation is all on


Select the correct category and thickness of your material. talk to a staff member If you are unsure.

Click push to laser to put your job at the start of the queue

Auto Focus Buttons


Place your material on the bed of the laser cutter then Auto focus the laser by pressing the top and bottom buttons on the laser at the same time.

Then press play on the laser cutter to get your job to start.

E-stop on laser cutter


Never leave the laser cutter running unattended as the laser cutter is a fire hazard.

In the case of a fire stop your job immediately by pressing the E-Stop button and call for a staff member to help.

Access

How to get Access to the Laser Cutters


Before you can use the laser cutters you will need to follow the steps below to begin your Laser cutting badge

MS Badge - Complete Workshop Safety Badge

Before you can use laser cutters first you have to complete the Workshop Safety Badge to gain access to the makerspaces

start laser cut badge Read SWP Here

In order to use the laser cutters first you must start the Laser Cutting Badge and read the SWP

laser cut learn Laser Cutting with Ruby

Follow this guide for instructions on how to send your file to the laser cutter.

put to test ENG MS Opening Hours

To complete the practical component of the laser cutting badge come into the makerspace and follow this guide.

Ask a staff member to check your work before you cut and Please ask for help if you have any questions!


Where Are We?

After you start your laser cutting badge you can find the Ruby Laser cutters in the James N Kirby Makerspace and the MCIC Makerspace

Before you come in to cut please be aware that there are two kinds of laser cutter in the makerspaces.

  • Trotec Speedy 400; Bed size: 1000*600mm
  • Trotec Speedy 360; Bed size: 800*500mm

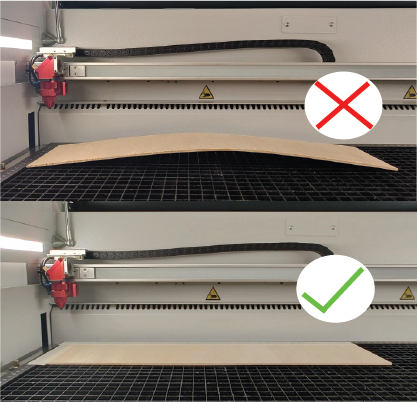
You are also expected to provide materials to laser cut, You can either bring in your own or purchase laser cuttable materials from our shop in the Kirby Makerspace.
If you bring in your own materials be aware that some materials are not allowed in the laser cutters see here for a list of banned laser materials.

BedsizeSpeedy400And360

Engineering Pricing Policy


In the James N Kirby Makerspace Laser cutting for Engineering courses is free, however for jobs longer than 30 minutes and for other coursework or personal projects a fee of 30$/hour applies.

Log In to Ruby

How to Open and Log In to Trotec Ruby

Trotec Ruby is the software we use to send files to the laser cutters. Ruby can be accessed through an online portal that we have to log in to use.

The Ruby portal is bookmarked on the computers and the login details are stored on the desktop of the laser cutter computers, as well as printed out and labelled next to the computers.

Each laser cutter has its own unique login, and files or material settings are not shared between lasers.

ruby homepage annotated


Manage Page

ruby manage annotated


How To
After we log into Ruby we will start on the Manage page to upload our design.

We can either Drag and Drop in our file, or click on the import file button and select our file to upload.


For optimal results we recommend using a .svg file type, however ruby will accept any of the following;

*.dxf; *.svg; *.pdf; *.ai; *.png; *.jpg; *.jpeg; *.bmp; *.tsf; *.tld; *.tlj; *.zip; *.cdr;

Be careful when importing .dxf file types as Ruby will often change the scale on import


Common Mistakes

  • Exporting your design at the incorrect scale - double check your scale is 1:1 before you export pdfs!
  • Exporting the wrong layers - Make sure your design is not on a hidden layer when exporting .ai files!

Watch the above video to see how to drag and drop in a .dxf file


Watch the above video to see how to upload a .dxf file


Design page

Ruby Design Page annotated


How To
The design page is where we can make small adjustments to our designs as well as assign colours to our paths in order for our lasers to perform the correct functions.

Any Parts of your design you'd like to be Cut need to be on the Red or Pink layer and need to be a Path or line.
Any parts of your design you'd like to be Engraved need to be on the Black layer and they need to be a Fill or solid shape.

After we change our colours click on Fit to Design then Create Job to send your file to the prepare page


Common Mistakes

  • Wrong scale - double check the scale of your job before sending to check it's come out at the right size!
  • Check Engravings - If you want a part of your design to be engraved it has to be on the black layer and a filled shape
Laser Cutter Guide-05.png

We use Different layer colours to perform different functions in the laser cutter, as you can see in the image above.


Watch the video for detailed steps on how to change your layer colours and check the scale of your design


Prepare Page

design page annotated


How To

To prepare our job for the laser cutter first we have to position our job on the bed, to help us do this we can use the red laser positioning dot as a guide.

Next we select our Material, make sure you have the correct material thickness selected. If you cannot find an existing setting for your material ask a staff member for help.

Before sending your job ensure Inner Geometry is First, Skip Overlapping Cutlines is On, and Geometry Optimization is on.

Once you have done all these steps you may Queue your job to add it to the next in the list for the laser, or Push To Laser to put your job at the top of the list and run it immediately.


Common Mistakes

  • Not positioning the job correctly on top of our material
  • Selecting the wrong material
  • Using the wrong colours

Helpful links

  • Guide to banned materials on the laser cutters
  • Check out our shop prices here

Watch the above video to see the steps to follow to prepare your job to cut on the laser


Using the laser cutter

laser panel annotatedAsset 11

Breakdown of Laser panel controls


How to Control the Laser Cutter

First open up the lid of the laser and place your material on the bed,

ensure that it is laid flat, and do not use any material that is too warped.

To help your material lay flat on the bed you may use some masking tape to tape it down.


Next to focus the laser on your material Use the Auto-Focus feature by pressing the Z - Up and Z - Down buttons at the same time.

Every time you put in a new material you will need to refocus the laser, and if your material is not flat the auto focus will not work correctly.

While the auto-focus is running keep an eye on the laser, if there is an issue and there is a risk of a collusion with the laser on your material - press the stop button immediately.


Next your job should appear on the screen next to the laser run it by pressing the play button.

Note
The laser will not run unless the lid is closed

Check that "Anchor point to laser" is turned off

If your job is not appearing on the screen you may have selected "QUEUE" instead of "PUSH TO LASER". In this case you can manually select your job from the queue using the laser panel.

Warped vs Unwarped material

Ensure your material is flat on the bed


focus button

To Auto-focus the laser press the Up and Down bed height buttons at the same time


play button

Once you have sent your job to the laser press the Play button to begin laser cutting.


Safety When using the Laser Cutters

Never leave the laser cutter unattended

The laser cutters are a huge safety risk and jobs should always be watched.

In case of fire stop Immediately and call a staff member for help

There are water spray bottles and fire extinguishers nearby to control fire hazards. Always alert a staff member in the case of a fire even if you think it's under control. There is a risk of damage to persons and equipment and a staff member will need to reassess the lasers.

Laser Collision Risk

To protect the laser never leave objects that could collide with the laser head on the bed of the laser, and make sure your material is flat.

Laser Cutter E-stop

Livestream Demo

For a thorough explanation on how to laser cut and get your laser cutting badge - watch the video below

Tips and Tricks

Materials v2-01.png
Materials v2-02.png


Quick CAD Tips

makercase box

Work smart, not hard

Trying to make a laser cut box? Need a custom enclosure for your Arduino Mega? Want to create a custom engraved box for a gift? There's a web app for that: MakerCase

This web app generates laser cut-able files from the specific dimensions you need - feel free to download the file and adjust it with engraves, holes and any other features you may need!

Grinding your gears

If you're in need of any gears for your robotic arm or want more torque out of your small hobby DC motors, use this Gear Generator to create laser cut gears!

Gear Generator


File Exporting Guide


Fusion360 to .dxf


FusionExportSketchDXF

To export a dxf from Fusion360 right click on the sketch you'd like to export and click "Save as DXF"

FusionCreateSketch
FusionProjectFromSketch
FusionSelectLinesToProjectToSketch

If you'd like to create a sketch to export from a solid shape you need to use the "Project" tool.

To do this create a new sketch, then under the sketch -> create tools go to Project and select the geometry you would like to add to your sketch then press OK.

you should now have a new sketch that you can export as a .dxf to send to the laser cutter


SolidWorks to .dxf


SaveAsSolidworks
SelectDXFSolidworks
SelectViewSolidworks
SaveViewSolidworks

Once you have made your design in solidworks save your file as a .dxf and then select which view you'd like to export and save.

Take care to ensure you've selected the correct view or face of your design. The laser cutter will not accept 3D files, you must choose which 2D face you'd like to laser cut.